Trish Burr has created some wonderful pansy projects and I've worked some of them, the most recent being Victorian Pansies. Before those, I stitched a design simply called Pansies.
 |
| Pansies (Trish Burr's original) |
What really caught my eye, however, was the highlight on the back of one of the petals. (Click for a larger image and see the inset with the green arrow.) I just had to see if I could stitch that highlight. It was the element that really made the piece for me, not that I wouldn't have wanted to stitch the pansies anyway!
The project was a kit with the design printed on cotton satin fabric. I'm not a huge fan of cotton satin for stitching because I find that it can be prone to 'opening up' around the edges of elements. I much prefer linen (or silk) for thread painting. I'm glad that Trish has since switched to a wonderful linen for her kits.
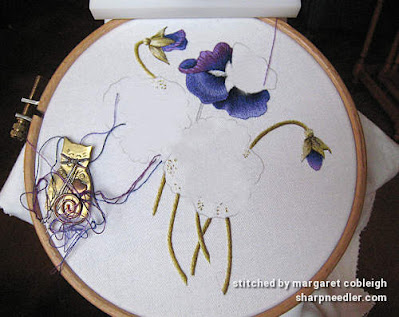
Working from back elements to front elements, I started with the stems and buds. (The pansies were embroidered with single strands of DMC cotton floss and a #10 crewel needle.) The stem for the topmost flower had to wait until the flower was stitched since the flower is behind the stem.
Next up were the bud sepals and the petals on the upper flower where I got to work on the highlight. I did a lot of thread parking evidenced by the mess of threads around the needle minder. (Thread parking usually looks worse than it is!)
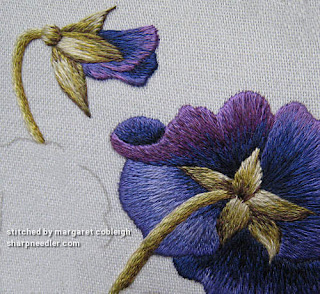
The highlight wasn't quite right at first. In fact, there were a handful of issues with these initial petals.
- The dark line has a stitch direction problem: it's too curved.
- The stitching on the highlight is too regular so it looks like a band. It needs more randomness because it looks unnatural. (You can see the band more clearly in the photo above this one.)
- The blending on the petal edge is too stripey.
Here's the improved version:
- I added a few more stitches along the edge of the petal to extend the dark colour and 'corrected' the stitches with the bad direction by lightly stitching over them.
- The highlight was made more 'sketchy' by extending some of the stitches outward. It now looks like a highlight and not just a band of lighter colour.
- I was able to get a little bit better blend by adding colour to break up some of the stripes, but there's still a problem because the two colours are simply too far apart value-wise to truly blend. If I had used a shade in between the two values I probably would have had better initial results. By the way, I was experimenting with shading along the edge of the petal so I created the striping problem. If I had followed the instructions I wouldn't have had striping.
As is usual with Trish Burr projects, the stems (and other green bits) are a gorgeous blend of colours. They look 3-D. I especially like the sepals; they have the coloured pencil look that I always work towards.
The middle flower came next. It was very straightforward and easy to stitch.
I was well-behaved and didn't overwork the thread. My reward was a lovely sheen on the floss.
The last pansy on the bottom was just as easy as the one in the middle. With the benefit of hindsight and more thread painting experience, I would stitch this flower differently today. I would create more contrast between the petals. For example, it's too dark between the top edges of the bottom petal and the two side petals. The bottom petal somewhat disappears into the two side petals.
Here are the finished pansies:
This was a very satisfying project and is still available from Trish as a download.
References


I love this. Wonderful to see it close up. The colours are sumptuous. And I totally agree that the highlight makes it.
ReplyDelete'Sumptuous' is the perfect word. Trish chooses the best colours!
DeleteSuch a beautiful piece, especially those colors.
ReplyDeleteIt's hard to go wrong with pansies and especially in purple! (I'm a bit biased, though, when it comes to purple. :-) )
DeleteAmazing stitching! Your pansies are gorgeous. But it the tips you gave are enormously helpful! I'm trying to teach myself needle-painting, and seeing the before and after of your fix is a lesson in itself :) I love pansies too, and have also been drawn to them recently. I just found out they come in pink, and am longing to stitch one!
ReplyDeleteI'm glad the tips are helpful! I hope you have found a suitable candidate for stitching. Pansies are a lot of fun to embroider. Trish Burr has some free pansy designs that might be a good starting point.
DeleteThis is such a beautiful piece. Silk shading is something you need to get into the swing of, and you have certainly done this here. The colours are lovely, I adore purple pansies! Have you seen Diana Lampe's pansy book? It is full of beautiful pansies!
ReplyDeleteOh, yes, Diana Lampe's pansy book is a definite must have. It's one of the things I'm using for my 'pansy pondering'. (By the way, all of Lampe's books are treasures; she does exquisite embroidery.)
DeleteGorgeous!
ReplyDeleteBreathtaking work! Thank you for the detail pics and for sharing your "mistakes." Very helpful to see the process.
ReplyDeleteI'm glad that seeing the process is useful. Thread painting takes practice, but it's also very forgiving and many things can be 'fixed' without ripping anything out.
DeleteGorgeous. Your patience is amazing, especially single thread.
ReplyDeleteAnother thank you here. Always helps to see what others feel about a pattern, or a reminders for your own work, which you did. :)