Until recently....
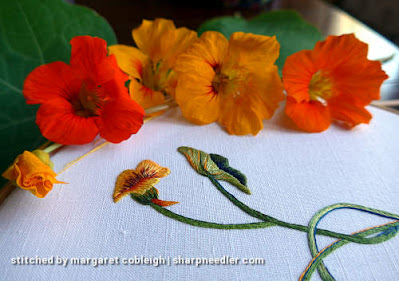
I've been able to complete the small flower and more!
I fussed a bit over the dark accents on the petals. The dark lines on the largest petal remind me of a false eyelash. The stitch lengths aren't as varied as I think they should be. I prefer the more random and spaced apart look on the right petal.
I still have threads parked at the ready in case I want to do a little more tweaking, but I think I'm probably done with the small flower. Sometimes it's hard to stop stitching!
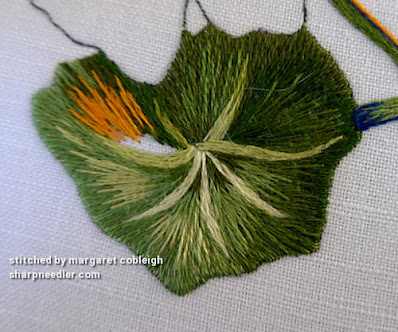
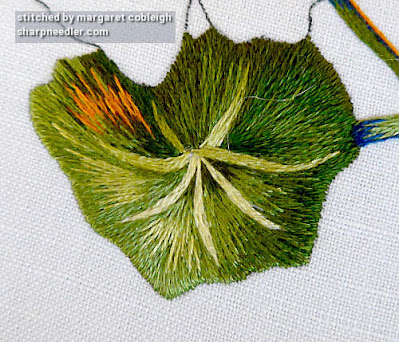
The big leaf was next. I stitched in a slightly different order than that listed in the instructions. The instructions say to do the veins--one at a time--as you stitch the leaf sections. Instead, I did all of the veins first. Because there are lots of colour changes on the leaf, I wanted to simplify what I needed to pay attention to so stitching the veins first was one less thing to deal with.
Usually, in thread painting, you split stitch element outlines before shading the interior. However, the instructions for Capucines do not call for the leaf to be outlined in split stitch which is fine, but I don't think my edge is as smooth as I'd like it to be. I get cleaner edges when they are split stitched first. One reason not to split stitch an edge is to make the element appear flatter as split stitched edges tend to be a bit raised. Since the leaf is below the flower, I can understand why you might not want to raise the edge.
Stitch direction was very important on this particular leaf, especially on the left side. It has a constant change of direction and I think it turned out well. (It helps when you pay attention to what you are doing!)
I finished off the leaf with the orange highlight. If you're a beginner to thread painting, notice how much orange I stitched and then see what was left showing when I finished. You always try to put in more of a colour than will ultimately be visible. The more colour you lay in, the more options you have in how much ends up showing.
The big flower is up next and I'm looking forward to it! I would love to finish this project before the nasturtiums in my garden fade away.


Thank you for detailed comments about thread placement, especially the before and after of the orange thread! I love your work so far - the two flowers on the right look so graceful.
ReplyDeleteThank *you* and you're welcome. I'm trying to remember to point out things I wish I'd known when I was learning how to needlepaint.
DeleteIf you have questions please don't hesitate to ask.
Thank you Margaret, I always gain so much from your posts.
ReplyDeleteMay I please ask, what is a good Rule of thumb for stitch length for big leaves and petals?
I would love to master those undulating curves.
Thanks you again for your graciousness.
Kind wishes,
Anna-Maria
Thank you, Anna-Maria!
DeleteGood question about stitch length. My generic answer is to use the longest length you can get away with! In practical terms that probably means no longer than around 1 cm to .5 inch, but I've used longer lengths.
Keep in mind how the completed item will be finished. If it will be under tension (example: framed) you can get away with longer stitches. If it will not be under tension (example: table linen) you can't make very long stitches because they will be loose.
You don't want your stitches to be too short because the finished shading can end up looking choppy. I always use the longest length I can. My goal is that the stitching is not noticed on a finished piece. I want to see the item that has been embroidered; the medium is unimportant. :-)
Experiment and see what works for you and the piece you are stitching.
Regarding the curves: they are fun! The next time I'm stitching something with good curves I'll try to remember to provide some detailed explanation.
beautiful!
ReplyDelete