I have completed most of the stitching on the white flowers (outlines and centres). I'm still debating whether or not I'll fill them with randomly placed beads, but that decision can wait until the end of the project.
I'm so glad the flowers are done! The outlining was tedious, but it allowed me to get much better at using the beading koma.
One thing I haven't had much luck with capturing in photos is the sparkle of the white beads. They have a finish that makes them look like crystals. You can see a little bit of the sparkle in this photo:
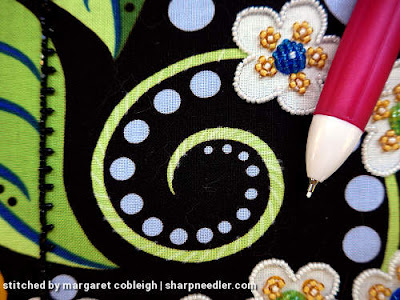
Next up are the green tendrils on which I initially used a white chalk pencil to mark stitch direction lines. I later redrew the lines in black chalk pencil as it was easier to see.
The tendrils are stitched with a leaning satin stitch effect. I think of it as being a bit like a highly overlapped stem stitch.
About every six stitches I stopped, went back, and couched down every green bead. I thought that would be terribly tedious, but the couching goes very quickly and also nicely locks down the beads. Here the beads are being couched:
In the photo above, notice that there are some small beads on the bottoms of the stitches that are kind of turned. It actually looks a right mess in this extreme close-up! The beads are wonky because I didn't make the stitch length long enough. (I improved as I went along.) If I was having this piece judged or graded I would have pulled those stitches out and redone them. However, I know that little problems like this will be completely unnoticed by virtually everyone except perhaps me, and I may even forget over time. The beads are so small and there is so much going on on the purse that a few sideways beads will not be noticeable when the purse is completed. This is a learning piece and I like to give myself the room to make imperfect stitches. My rule is: If it will be noticed fix it, otherwise let it go. Life's too short and I have too many embroidery projects to spend time on unnecessary perfection!
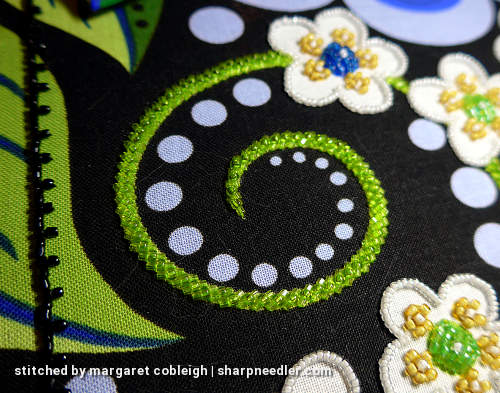
The completed curve is spectacular! I haven't yet found sufficient words to describe how cool it looks. The fabric appears as if it has been enameled or bejeweled. The green fabric beneath the green beads adds depth to the overall effect. The big bead in the stitch centres creates a spine down the middle and adds extra texture, which is a really nice touch on the part of the designer. This is by far my favourite technique learned on this project to date. I can imagine using this effect on other efforts.
The before and after says it all for me (or perhaps that should be after and before!).


Thank you for sharing this interesting project Margaret! The stem is indeed amazing! I wish I had times to start a beading project too; my fingers itch :).
ReplyDeleteI know the feeling. We all have so many projects and prioritising can be so difficult!
DeleteTurned out beautiful.
ReplyDeleteThank you! So far so good...
DeleteBeautiful work! I love the graceful, sparkling vine the stem stitch makes ❤ I have always loved the look of bead embroidery and would like to learn, so it's wonderful to be able to follow your progress like this 😊
ReplyDeleteThank you, Aurelia. Bead embroidery is a lot of fun. Do give it a try!
DeleteThis is so lovely. Oh, how I wish you would come to Va Beach and teach this class!
ReplyDeleteThe project was designed and taught by Mary Alice Sinton. I'm sure she'd be happy to hear from you about teaching the project.
DeleteMary Alice's web site:
http://bluebonnetstudio.com/
Still bummed that I had to miss this class...
ReplyDeleteThanks for sharing Margaret. This is such a beautiful project, and I really love that green tendril. I can only imagine how amazing it must look in person!
ReplyDeleteThank you, Catherine! The tendril is stunning in person especially when the sun hits it. Photos definitely don't do it justice.
Deletewow, this is incredible!
ReplyDelete