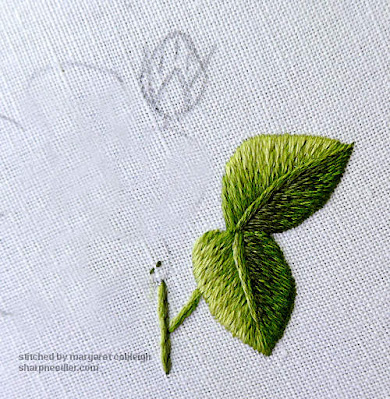
With the leaves completed on
Trish Burr's Red Alpine Rose, the next element to be embroidered is the bud. We are still working from
background to foreground and the bud sits behind the flower.

Bud
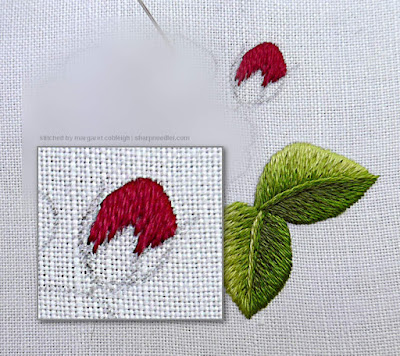
The red part of the bud is very easy to embroider. As far as stitch direction
goes, it is straight up and down (see marks on photo above).
The bud is made up of two shades of red. The darker one is the shadow.
Unlike the leaf halves which were also composed of two colour shades, the bud will be filled in a different way. It will be almost completely filled with the first colour. The second red will be added as a shadow. Shadows are one of my favourite things about thread painting, but they can be overdone resulting in heaviness and dark clumps of colour.
Unlike the leaf halves which were also composed of two colour shades, the bud will be filled in a different way. It will be almost completely filled with the first colour. The second red will be added as a shadow. Shadows are one of my favourite things about thread painting, but they can be overdone resulting in heaviness and dark clumps of colour.
When there's a shadow colour as one of the element's shades, the element is nearly filled with the non-shadow colours. The shadow is
an accent that adds depth and
can increase contrast with surrounding elements. Shadows provide nice finishing
touches.
To begin embroidering the bud, outline the outer edge with split stitch and
begin filling the shape with the first row of red. Start in the middle of the
bud and work to either side. Remember on this first row to come up inside the
bud and go down over the split stitched edge. Also, ensure that all design
lines are covered by stitching. Below, I have completed the right side. The
next step is to return to the middle and fill the left side.

Continuing with the shadow colour, come up in the
first row and go deeply into the first colour with some of the stitches staggering the starting points. Below, notice that along the bottom edge of the red
along the sepal I have left some of the lighter red showing. The edge along
the sepals is not solidly filled with the darker red. I could certainly add
a few more dark stitches, or not. I've chosen not to do an intense shadow,
but that's a personal choice. Do that which pleases your eye.
Note that you can stitch over the first red with the second if you want to place a shadow stitch where there's already a lighter red stitch. Thread painting is very flexible. I could have easily stitched all dark red shadow stitches along the sepals despite the first red filling all the way to the sepal edges in some places.

Sepals
I have broken the 'background to foreground' rule with the sepals. There are a
couple of sepal bits peeking over the back of the bud. Technically, they are
behind the bud, but since they are just straight stitches, I let them wait
until I was working on the rest of the sepals.
The other rule I'm breaking is to stitch all the sepals on the front of the bud at the same time even though they overlap. They are so small--the entire bud is about the size of my pinky nail--that it won't be a problem to slip in the second colour. Of course, it's perfectly fine to stitch them one at a time!
The rose design has five greens. I think of them as shades 1-5 with 1 being the lightest.
The sepals use greens 2 and 3 and they are so small I did not outline them
with split stitch first. Split stitching would have probably filled or nearly
filled some of these elements and would have gotten in the way when
filling. I also didn't want a raised edge. I prefer that the sepals lay flat on the rose. Feel free, however, to outline them if you like.
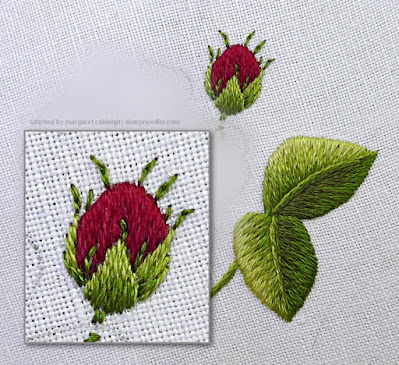
I stitched the two side sepals first and then the central one. As on previous
elements, I've nearly filled the sepals with the first green in order to give
me plenty of colour to work into with the second row of green. Here's the first row
(green 2) completed:

The second green was then blended into the sepal elements. It was also used for the various straight stitches around the bud and I was careful not to cause damage to the bud stitching along the top edge.

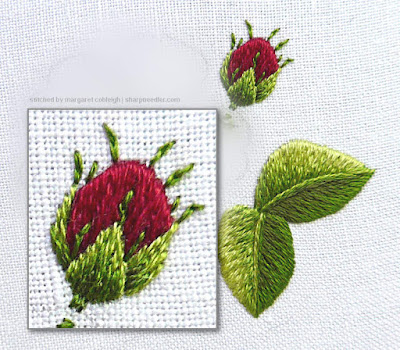
For extra credit, as with the leaves, add some of the next darkest green (4) to the bases of the three sepals. Only add a very few small stitches and be careful not to bite into any of the other sepals by carefully sliding your needle under the already stitched areas. I think there are only two or three shadow stitches on the right sepal. There might only be one shadow stitch on the left sepal. (The colours blend so well, it's hard to tell!) The picture below is poor quality, but you can see how the darker green shadow in the right sepal makes the light green edge in the central sepal pop just a wee bit. That's good! There's also a little more depth on the central sepal.
When you are adding things like these little shadows always start with less and only add more if absolutely necessary. Don't overdo it! In general, shadows should be subtle.

The bud is done. That wasn't too difficult, was it? If you haven't started the project yet, you could stitch the bud before the leaves.
In the final lesson we'll work on the flower petals where you'll get a lot more practice blending colour. It'll be fun! (Please visit the Gallery to view the other lessons for this project.)
If you have questions or need more clarification, please ask.
In the final lesson we'll work on the flower petals where you'll get a lot more practice blending colour. It'll be fun! (Please visit the Gallery to view the other lessons for this project.)
If you have questions or need more clarification, please ask.


No comments :
Post a Comment