(Warning: This is going to get extremely geeky!)
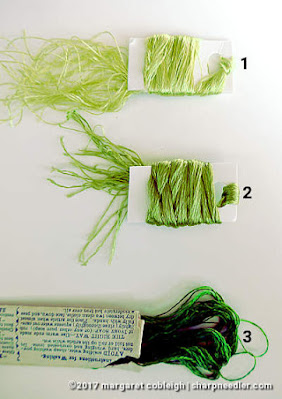
The leaves are composed of three greens.
When it comes to shading (i.e., thread painting, needlepainting, and all the other names for it), there are several 'rules' that I follow. Two of them are:
- Work from outside to inside
- Work from light to dark
I also want to point out that since this is a table linen and will be laundered, I add extra anchoring stitches--at least four--when I start and end a thread. I want to ensure that the threads are well attached, but I don't use knots.
 The other thing I try to remember when stitching table linens is to keep my stitches fairly short. Since the finished piece will not be under tension (for example: framed), I don't want to end up with floppy stitches.
 The example to the right is a leaf from an authentic piece of Society Silk embroidery. It's a little larger than the leaf I'm working on, but it clearly shows what happens when your stitches are too long; they wander all over the place once the tension of the embroidery frame is removed. It's also possible that this leaf was worked in hand, which is not something you want to do with long and short stitching. You need strong tension on the ground fabric in order for the stitches to lay flat.
But I digress. Let's get back to my leaf....
Normally I would start by outlining the leaf in split stitch, but since I'm using fairly rare antique threads I'm erring on the side of conserving thread and am not outlining. In general, you should outline any shape that is going to be shaded. It's another one of the 'rules'!
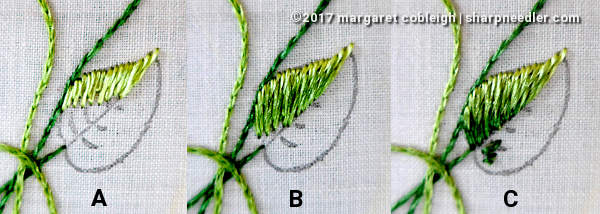
Starting with the left side, and following the two rules from earlier, I stitched from the outside edge towards the central vein and from light to dark green (greens: 1, 2, and 3). I started at the tip of the leaf and embroidered down towards the stem.
First I stitched colour 1 (A) and laid in a lot more colour than will show when finished. Putting in lots of colour gives you more area to stitch into with the next row/colour. Colour 2 is stitched next (B). Notice that colours 1 and 2 almost completely fill the area (B). Finally, the shadow colour 3 is added (C).
The right side of leaf presents a conflict between the two rules because the shadowing is on the outside. I had to choose between outside to inside or light to dark. Outside to inside won so that the stitching would match on the two sides of the leaf. By that, I mean that I want the stitching to end along the central stem, with the final stitches on top in the centre of the leaf on both sides.
The reason I generally stitch light to dark is because I prefer adding shadows last. It makes logical sense to my brain to colour in that order. I also think doing shadows last yields better results. I don't particularly care for doing the shadows first, but it's not the end of the world.
Here's the right side of the leaf worked tip to stem, from outside to inside and dark to light. First comes the shadow colour 3 (D). Colour 2 is added next (E). I added a few extra shadow stitches (colour 3) along the outside edge (going up towards the tip) when colour 2 was complete (E).
After the leaf was completely filled with the addition of colour 1 (F), I finished the central stem/vein (G). Even though there are side veins drawn on the original design, I chose to ignore them. I thought they would add unnecessary clutter. If I had stitched the leaves in a single colour, I would consider adding veining.
Here's the finished leaf from a different angle...
...and in an extreme closeup.
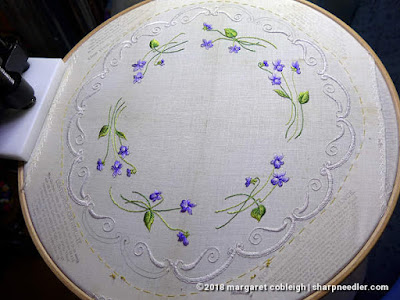
Enough with the geekiness! Let's see some pretty flowers. Here are the final two violet bunches. The leaf from above is in the left hand bunch.
I'm planning on adding a bit of gold to the centres of the violets, but other than that there are only two scallops and edge cutting (non-trivial!) to go.


Thank you so much for the very useful guidance and photos. The piece looks great! And I have learnt a lot from studying your immaculate stitching.
ReplyDeleteYou are welcome and thank you for the kind words!
DeleteThis order of work makes so much sense to me, thanks! Your hoop holder looks interesting; is it a table clamp or floor model?
ReplyDeleteYou are welcome!
DeleteThe hoop holder is a Needlework System 4 (NS4) Frame Clamp. I've been using it for almost 10 years. It's great and I highly recommend it. I use the clamp on both NS4 floor and table stands.
The Great Enabler, Mary Corbet, reviewed NS4 here (and in other posts):
https://www.needlenthread.com/2008/01/needlework-system-4-floor-stand-review.html
There are some photos of the clamp in the review.
By the way, I use the clamp with both hoops and frames. It works great with Mythic Crafts slate frames since their frames aren't overly heavy.
I so love this piece Margaret! Thank you for showing how you deal with shading your beautiful leaves.
ReplyDeleteYou are welcome and thank *you* for the kind words.
DeleteDear Margaret, your stitching is sublime. Appreciate you sharing your insight and thought process while stitching.
ReplyDeleteThank you! I'm glad you found the geeky details interesting.
DeleteWell, I will echo your other commentors and say how wonderful your stitching is too. I love the guides you are providing and it is especially helpful as I am working on the Crazy Quilt Journal Project. Thanks!
ReplyDeleteYou are welcome. I'm glad the little guide is helpful.
DeleteThank you for the compliment on my work. I appreciate it!