No, that's not quite true. After the first couple of flowers, I got bored. I can't help it. I don't like a lot of repetition. One aspect, in particular, of the outlining of the flowers really bugged me for some reason.
The process for outlining a flower is this:
- Load up enough beads for one petal on the beading string
- Wind the beading string on the koma
- Outline the petal with beads (by couching)
- Unwind the koma and remove the excess beads
- Sink the bead thread at the end of the petal
- Come up at the beginning of the next petal
Lather, rinse, repeat...
The part about constantly winding and unwinding the koma got to me. I wanted to string enough beads for the outline of the entire flower and just keep going without the winding/unwinding.
(Please note that there is no criticism implied of either the project or the designer. It's my problem!)
Then I saw this, which shows a string of beads going around a sharp turn without stopping and starting the beading string:
It's from the book Bead Embroidery Bag by
(I also found a similar diagram in the Wild Child kit's stitching guide at a later time.)
Hmmmmm....
I'm always looking for more efficient/faster ways of doing things, usually to escape from boredom (i.e., repetition). I think of it as a form of laziness, in a good way. I don't want to use any more energy/time than is absolutely necessary to accomplish something.
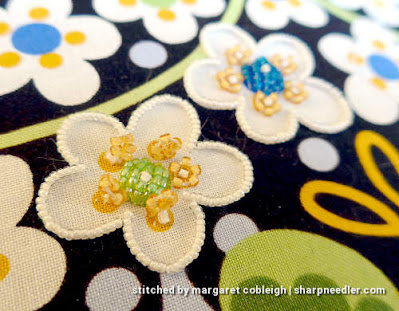
My lazy little brain thought the method in the book diagram might work on the flower outlines, so I tried it (of course). In the photo below, the flower on the left is outlined using a continuous string of beads. The other two flowers are outlined as per the kit instructions.
Works for me! It's also faster. It took me 75 minutes to stitch each petal individually (winding and unwinding that darned koma!) and a little less than 60 minutes to stitch continuously (and that included dealing with a couple of knots).
I'm adding in some extra anchoring (aka pinhead) stitches at the beginnings and ends of the petals to keep the beads from wandering around, and I'm happy with the results. I make no claim that what I'm doing is correct, but it's good enough for me (and so far the embroidery police haven't shown up at my door).
The other thing my lazy brain decided would be more efficient--and would help keep things interesting--was to stitch the centres of the flowers as I go. I should really be stitching all the outlines and then going back and do the centres. I knew that stitching just white outlines for a lot of flowers would drive me crazy. There doesn't seem to be any adverse effects of stitching the centres as I go, so that's what I'm doing. It's nice to add a bit of colour after the white outline. Additionally, I can just keep using the same beading and couching threads, so that seems very efficient.
I enjoy stitching the centres; they're very satisfying. It's fun to do the padding and lay the finishing beads over the top.
The last lazy thing I've decided to do is to add all the yellow beads for the flowers around the centres at once and then go back and couch them down. I was doing each yellow flower one at a time and I like doing them in batches better. It's working fine.
Here are the little yellow flowers waiting to be couched. (One has been couched.)
In Praise of the Kit
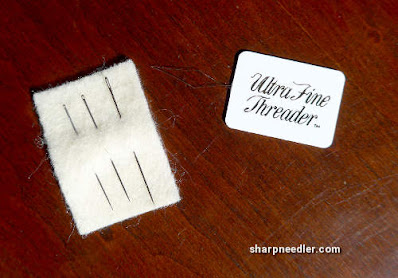
The Wild Child kit is excellent. It came with some much-appreciated niceties such as an ultrasuede bead holder and an ultra fine needled threader. The beading koma and needle minder were separate pre-class purchases, but they are great additions to the kit.
The kit needles are Japanese. Two needles are threaded up at all times. One is for beading (the smaller of the two) and the other is for couching. The needles are tiny! In the photo below the Japanese needles are on the left and a crewel #10 is on the right.
Confession time: I've started using the crewel #10 for couching because there has been more than one occasion where I threaded the Japanese needles backwards (couching thread in the beading needle and vice versa) because they look very similar. The crewel needle looks different (i.e., huge) and I don't have to pay as much attention when I'm threading up the needles. (Yet another instance of laziness!)
Making Progress?
I'm making decent progress on the flowers, but I think I might be spending too much time working on them because this has been happening a lot lately:
Little Miss thinks I should pay more attention to her. We have discussions about her being in the way of my stitching, so she sometimes tries to help by crawling under the frame and playing with the threads.
After promising to pay her some attention later, she left me alone for a while. However, her brother found that he, too, needed attention. He decided that my project would be a good place to rest his head. Maybe, just maybe I'd notice him.
It's a challenge to be an embroiderer sometimes!
At this point, I'm over halfway through the flowers. They are supposed to be filled with beaded seed stitching, but I may opt out of that. I like this photo because it nicely displays the differences between the embellished and non-embellished flowers.
I'm looking forward to completing the flowers and moving on to other elements especially more colour!


I know what you mean by the constant stop and go. I'm working on a beaded project and had much the same. It does make for better corners though. You mentioned this was a kit, who sells it?
ReplyDeleteThis is a kit from a class. I don't know if the kit is available separately from the class, but you could certainly ask the teacher, Mary Alice Sinton.
DeleteHer contact info is at the bottom of the the first post for this project:
http://www.sharpneedler.com/2018/01/bead-brain.html
I'm pondering about the corners because logically it makes sense to me that plunging the beading string should make for sharper corners. However, since I wrote this post I've finished off the flowers and I'm starting to forget which ones are stitched with a continuous string and which ones are not. I think continuous worked out OK in this case, but it might not be as well-suited to a different design.
This is a lovely piece, and it’s good to see I’m not the only one with needy companions 😊 your beading looks lovely to me, and it sounds like you’ve found a satisfactory solution. I know what you mean about repetition being boring, then I procrasuand that just makes everything worse. I’d be doing the centres as I went too I think! Good all round 😊
ReplyDeleteOh, yes, procrastination definitely makes things worse! You just have to get on with it. It's usually worth it in the end.
Delete'Needy companions': excellent description! :-)
Thank you so much for this hint and the diagram! I've done a bit of bead embroidery but having to stop and start constantly is so darn annoying and a time waster. I will definitely keep this tip in mind for the future :) Your kit is coming along nicely and your stitchy kitty companions are super cute!
ReplyDeleteYes, do give it a try and see how it works for you. I don't think a continuous string would always be appropriate, but it seemed to work in this case (with extra anchoring/pinhead stitches!).
Deletethis is looking beautiful!
ReplyDeleteLooking good!
ReplyDelete